
In the last posts, you saw how to start the implementation and how to classify and label your documents. This doesn’t protect the content of the documents. The protection is defined in Azure RMS (Right Management Service) which is still managed over the old Azure Portal (https://manage.windowsazure.com). You can define multiple RMS Templates, which will define:
- Rights: Which Azure AD Groups, can do which actions with the documents.

- Scope: Which Users can use this Template to Protect documents. This should be aligned with the Azure Information Protection Label. I normally use an All Users Group.
- Configure: Translation for of the Template Names, Content Expiration and limiting offline access to protected documents.
I create for each AIP Label, which requires protection, an appropriate RMS Template with the same name. This means, that that I have for example a Label with the Name “Confidential” and also an RMS Template with the same name.
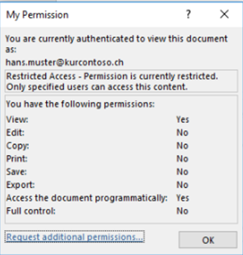
When such a label is assigned to a Word Document, then you can see which permissions you have in the Information Pane:

Now your data is protected. Everywhere and not only in your internal network. If you save such a document to an USB Stick or to a Dropbox account, you can open the document on any other computer. But the document can only be opened, if user credentials are provided, which have access to the document. If the account, which is logged on in the application has no access, then the following Information is displayed and you can sign in with your permitted credentials or request access for the current user:

External Users
In normal Case the RMS Templates will allow access to the document only to internal users. If you have for example a document, which should be shared with an individual in another company, you can add custom permissions to the document and afterwards also an external identity can open the document.

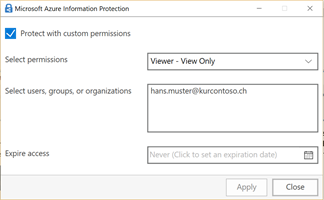
Then you can send the document to the other user and he can open it with the appropriate rights:
In my next blog I will share, how you can block the sending of classified mails to users outside of your company, so stay tuned and follow me on twitter @ThomasKurth_CH to get an update, when the next post of this series is online.
- Microsoft Sentinel ASIM Parser demystified - March 31, 2024
- Enhancing Network Security Insights with IDS/IPS of Ubiquiti Dream Machine Pro and Microsoft Sentinel - March 10, 2024
- Ubiquiti Dream Machine Pro Logs to Microsoft Sentinel - February 6, 2024

1 Comment
Protect your Data – Stop losing control over it – Data Classification - Workplace Management Blog by baseVISION · May 4, 2017 at 13:41
[…] you would like to read more about how to define the Azure RMS Protection, then read my next blog post and follow me on twitter […]